This blog site focuses on cards and projects utilizing materials and tools from various scrapbooking and paper craft companies.
If you are interested in cards and projects made with rubber stamps from various companies, please check out my other blog site "Stampin' Inspirations".


Come and join the Christmas Group Site on Paper Craft Planet
Click on the banner below


Wednesday, February 28, 2007

Daily Special - Technique Day - Rock and Rolling

Today's Daily Special is Technique Day. The "Rock and Rolling" technique is a very simple technique and isn't new but because I used this technique on the card I created, I wanted to share it with those who are unfamiliar with this technique. This technique shades the edge of solid images as demonstrated by the flower image on the card I created to the right.

Click Here for the Tutorial

You may also click on the title of this post to be linked to the tutorial.


Until later . . .have fun stamping!


Oh. . .by the way. . .I feel much better now. . just a bit stuffy but I no longer have the post-nasal drip that was driving me crazy for the last four days.


Product Review - Sakura Souffle 3D Opaque Puffy Ink


Whenever I see I products I haven't used, I buy them just for the purpose of experimenting with it. I bought this pen set that I saw at JoAnn's which I've never seen on their shelves before. It's a 3-D Opaque Puffy Ink and I expected it to be "puffy" similar to Liquid Applique. Instead, the result is more of an embossed appearance. What I do like about it is that you can highlight areas of your image to appear embossed without having to deal with a heating tool. You can also write a message and it'll appear embossed. It works great both on dark and light colored paper and works best on non-porous surfaces such as plastic, vellum, acetate, coated paper and such.

I used it on regular card stock to highlight a stamped image and it worked fine. As you can see in the picture the pink outline of the flower has an embossed appearance. I think it would work great for "faux stitching" because of the embossed appearance. I'll try it out on my next card project.


I'll experiment a little more and see what it can do on other surfaces. Overall, I highly recommend it and it's sold at JoAnns. ****It's pricey so I would not recommend purchasing it unless it is on sale. Regular price is $19.99 - because there's only 10 pens in the set, it's not worth it for that amount but it's worth it at 40% off. Wait for the 40% off coupon before purchasing it at JoAnn's.

Until later. . .


Monday, February 26, 2007

I Still Have This Stupid Cold but I Did Make One Card


Yes, I still have this cold that I've had for the past 4 days. My eyes and nose cannot stop running. . .it's driving me mad. There hasn't been a second that's gone by without either my nose dripping or my eyes tearing. I'm not a believer of taking cold medications at all so I've been doing everything non-pharmaceutical to help relieve my symptoms. I've been drinking soup for the past three days, taking vitamins, eating fruits and vegetables, steam baths, sleeping, resting, relaxing, etc. . The only medication I've taken was Tylenol but today, when I woke up with the same symptoms with no relief. . .I've had it! I saw Zicam in the medicine cabinet and decided to try it out. I'm not even sure what it is. All it said was that it'll relieve the symptoms and duration of a cold. So I tried it out and although it helped with the tearing and runny nose a little, I now have a headache. Anyway, enough with my whining.

I did make a card 3 days ago, right before the flood of tears and runny nose. I stippled Jacquard Lumiere acrylic paints directly on to the white cardstock. I just love the shimmery appearance of the mix of colors I used. Unfortunately, you can't see the shimmery effect . . .the camera just can't seem to capture it. Oh, well. I inked the flower using Stampin' Up Lavender Lace but left the center un-inked. I took a stipple brush, inked it with Super Copper Lumiere and stippled the center of the flower to match the colors of the background.


Card Detail:


Stamp: Rubber Stampede Gerbera Daisy
Paper: White cardstock, Stampin Up Lavender lace, Orchid Opulance
Ink: Jacquard Lumiere Acrylic Paint: Super Copper, Metallic Olive and Pearl Violet, Stampin Up Lavender Lace
Accessories: Organdy ribbon, 1 inch and 1 1/4 inch circle punch, gold metallic cord, gold brads
Try this sketch challenge. . . it's a simple sketch but use your imagination and add various elements to make your card unique.


Hopefully, I'll feel better later tonight and I'll be able to make a few more cards. I'll let you know if the Zicam works.


Until later. . .

Friday, February 23, 2007

Whaaa! I have a cold!

I haven't posted anything today because well, I caught a cold. I haven't had a cold for such a long time, I can't remember the last time I had one. My kids had a cold during the weekend and I think I may have contaminated myself by drinking out of one of their cups accidentally. I'm usually VERY careful with handwashing and that is why I rarely ever catch a cold but I think one of my kids left a cup of soda on the counter and I thought it was mine so I drank from it. Hopefully, I'll feel better tomorrow and will be motivated to make a few things. Anyway, just letting you know why there's no card blog for today!

Until later. . .

Wednesday, February 21, 2007

Random Card - Penny Black Fat Cat Birthday


Just a random card I made. I really didn't work on anything today. I was busy watching the Anna Nicole Smith case on Court TV. It was really interesting. I don't watch much television but when I do watch, I like to watch the View and Court TV during the day, CSI and Supernatural in the evening. I heard Heroes is pretty good. I saw one episode but based on what I heard, maybe it's worth looking at.

I'll work on cards tomorrow. I have a few projects I want to work on. . .I'll post a few of them tomorrow.

Until later. . .


Tuesday, February 20, 2007

Personal Rambling - It All Makes A Whole Lot of Sense Now

OMG. . .I now know why I've been feeling weird for the past 3 days!! I thought I was coming down with something or something was really wrong with me. I couldn't concentrate, I felt antsy and unable to focus on anything. I didn't even want to make any cards or rubber stamp. I was beginning to feel really tired and couldn't understand why. I was beginning to worry that something was really wrong with me. I thought I was going into some sort of depression. Seriously. . .I really was beginning to feel really depressed.

Yesterday, I hit rock bottom. I woke up feeling like I didn't sleep all night. . .I thought I had the flu or something. I woke up, made a card, and went right back to bed. I slept at least 4 hours mid-morning and I got up feeling not at all refreshed. All day and all evening I was dragging my butt. It took all the effort I could muster to motivate myself to rubber stamp anything.

Anyway, today as I was making coffee. . .my husband pointed out that I was brewing decaffeinated coffee! DECAF! I looked at the bag and realized that for the past 5 days I was making DECAF coffee! The bag was nearly empty! OMG. . .that explained it all!

I was suffering caffeine withdrawal!! I had no caffeine for 5 days! Wow. . . that was a major eye-opener. I never realized that caffeine could have such a major influence on my life. I quickly threw away what was left of the decaffeinated coffee and began brewing the regular coffee. It's really scary to think that coffee can effect me this way. It's a drug! I'm not sure it's a good thing. . .considering how I felt when unknowingly I was not taking in any caffeine.

I think if I had known I was drinking decaf coffee, my response would have been different because I would have been conscious of it and would have mentally tried not have it affect me. Because I was unaware of it, the true response of not taking any caffeine became quite apparent.

Well. . .I'm back to my lively, happy self again!! I had my first sip of real coffee today. I think everything will be okay now.

Daily Special - Technique Day - Prismacolor Pencils and Gamsol

I posted a tutorial on my Stampin Inspirations blog site on the Prismacolor Pencils and Gamsol technique. I wanted to share it on this site for those who are unaware of my other blog site.

Click Here to be linked to the post which links to the tutorial!!

Try it out and tell me what you think!

Until later. . .

Random Card - Sketch Challenge

Just a card I made yesterday morning. I wasn't feeling well all day so after I made this card, I decided to take a little break and take a nap. I feel better today and can't wait to create a few projects.

My daughter did not go to school today because she wasn't feeling well either. I made chili for dinner. . .one of her favorite homemade dishes and she decided to pass it up. . .this told me that she "really" wasn't feeling well. Since she was a baby my daughter have been a very finicky eater and her menu choices are FRUSTRATINGLY LIMITED. It drives us bananas. When she was little she had an issue with eating pork and beef meaning Pig and Cow. She settled with eating chicken because she knew she had to eat some sort of meat so she decided she was okay with chicken. Everything other than chicken - like pork and beef - had to be referred to as chicken otherwise she won't eat it.

Now that she is a teenager, she is well aware that she is eating pork and beef and is now okay with it as long as there's no blood visible. We no longer have to "lie" to her and tell her that she's eating chicken. BUT she now has a problem with chicken. . .it has to be skinless and chicken breast only. She'll eat thighs and drumsticks but hesitantly and because she has no choice. It's annoying but oh, well. . .what can we do.

Anyway, have fun with the sketch challenge!


Card Detail:

Stamp: Inkadinkado Kathy Davis 96028, Anna Griffith sentiment stamp
Paper: DCWV light green textured cardstock, Cameo Coral, Creamy Caramel, DCWV scrapbook paper
Ink: Stampin Up Really Rust, Green Galore, Cameo Coral
Accessories: Organdy ribbon, Marvy Photo Corner Punch, Large Dark Brown Brad


Until later. . .

Monday, February 19, 2007

Featured Blogger of the Week - Artistic Explorations

Check out Peg's Blog Site. Her site is called Artistic Explorations and is my "Featured Blogger of the Week". She makes absolutely beautiful projects such as boxes, notebooks, journals, etc. She makes great use of patterned papers for her projects. They are inspiring!! Lately I've been really in to creating things other than cards and her blog site are a great source for ideas. Check it out when you have the chance. I believe you'll be inspired as well.

Sunday, February 18, 2007

Guest Rubber Stamper - Sue

Sue is one of my readers and she was kind enough to send me pictures of a bunch of cards that she made. Here are a sample of the cards that she sent to me. I love all her cards and as you can see, she is very talented. If you send me pictures of a few cards that you've made, I'll post it on my blog. I just need your permission to do so and permission to state your name on my blog.

Thank you Sue for the pictures. I really appreciate your work.


Until later. . .

Saturday, February 17, 2007

Daily Special - Anything But Cards - More Altered Notebook

I was on roll yesterday. . .I decided to make a few more altered notebooks. See yesterday's post for the tutorial. I had a lot of fun making them. The first notebook is a regular steno book and I covered it with cardstock and scrapbook paper. The circular design was made out of chipboard which was decoupaged and decorated with paper daisies by Making Memories. I rubberstamped the background with Hero Arts Daisy rubber stamp. The sentiment is by Great Impressions. To decorate the notebook, I used scalloped scissors and three types of ribbons.


This notebook was created with the same process as that I demonstrated on my tutorial yesterday. The rubber stamp sentiment is by PSX. To create the piercing design, I used Stampin Up Crafter's Tool Kit (paper piercer). To top of the design, I added prima flowers and three types of ribbons.


When you have the chance, alter a few notebooks. It's not any more difficult than making a card. I decoupage the cover because decoupage is water resistant and helps preserve the cover from the elements (modge podge may be used as a substitute).
Until later. . .

Friday, February 16, 2007

Daily Special - Anything But Cards - Altered Notebook Tutorial

Today's Daily Special is "Anything But Cards". I chose to do a tutorial on altering a notebook. It's fun and easy to create. It's a great way to personalize your notebook. . .to make it your own. I love altering notebooks and whatever lies around the house. Altering a notebook is a no-brainer and who doesn't love notebooks especially when it's personalized. There's nothing sold onretail that matches your own unique creation!

Click Here for the tutorial or click on the title of my post!

Is my tutorials helpful? Are they easy to follow? Just wondering. . .I rarely receive any comments on them so I'm not sure if they are helpful to anyone. I'm not fishing for comments. . .I'm just wondering if I'm doing tutorials on projects that are interesting to others. There's one thing that I find them fun to make, it's another thing if others do. . .I know how to create them so these tutorials are purely for my readers!
Let me know what you think and what other tutorials that you would like for me to concentrate my efforts on. . .
Until later. . .

Like My New Header?

What do you think of my new header? It's okay, huh? I could have done a better job but I was just too lazy to look for a good image or take a picture of a better header image. I used what I had. I'm never satisfied so I decided to just do with what I have for the meantime. Don't be surprised if it changes. The flower image was the only pretty flower image I had on my computer so in order to just complete a header, I used it.

Anyway, I didn't want it to be an all day project - I just wanted to finish it. It looks pretty good for now. Like I said, don't be surprised if it changes again one day. It's like creating a card - I had to choose an image, a font, the color combo, etc. and it's not the process that is difficult, it's choosing the elements that makes it hard. I got tired after awhile and just settled with what I created. Hope you like it!

Until later. . .

Thursday, February 15, 2007

Daily Special - Sketch Challenge

Everyday is Sketch Challenge Day!! Scroll down and view today's sketches.Well it was an uneventful and very unproductive day. I frustrate myself sometimes. It seems that I can't seem to do anything productive. . .


Like I've said in the past, I sometimes feel I have an attention deficit disorder. It's amazing I can even keep up with two blogs and make a few cards. It appears that I get a lot of things done but I am not as productive as I'd like to be. It seems as if the day goes by so quickly and before I know it, it's time to go to bed.

Anyway . . .here are two cards with sketches that you can try out on your own. Very simple sketches but you can do a lot with them

Try it out!


Sketch #2

Just a Birthday Card I made. I really was at a lost as to how to dress up this card. I had a creative block.

Because this card is meant for a boy, I didn't want to add too many cutesy things. I have a really hard time making "masculine" cards because it's hard for me not to add ribbons, flowers, or something cute to embellish the card.

I added the tag just to dress the card up a bit. I'm not sure a little boy would appreciate the tag and ribbon but I couldn't help myself. Oh well!

Anyway, enjoy the sketches. Hopefully, I'll have time to make a few cards tomorrow. I've been having difficulties managing my time these days.


Until later. . .

Wednesday, February 14, 2007

Daily Special - Technique Day - Stippled Background with Acrylic Paint and Pearl Ex

Click Here for the tutorial or click on the title of this post.


Today's Daily Special is Technique Day. Today's technique is "Stippled Background using Acrylic Paint and Pearl Ex". Also check out the sketch challenge for this card below.


This tutorial is similar to the Lumiere and Classic Ink technique that I posted several days ago but the mediums are different. Instead of Lumiere and Classic dye ink, this technique uses Acrylic Paint and Pearl Ex to create a similar effect.

The result of this technique is a background with a very shimmery effect and a raised texture created by the acrylic paint. Acrylic paint is thick and when stippled, unlike dye inks which a flat smooth appearance, it has a raised rough texture.


Click here for the Lumiere and Classic Ink technique. Both techniques have a shimmery effect.


The photo don't represent the technique very well because it's hard to capture the shimmery effect of the background and I also covered it up with my design but trust me, it's really pretty.


Sketch Challenge


Until later. . .

Tuesday, February 13, 2007

Daily Special - Technique Day - Shaving Cream Technique


Today's Daily Special on my Stampin Inspirations blog site is Technique day and I wanted to share the "Shaving Cream" tutorial with this blog site. When I have the time today, I'll post a card using this technique on to this site using non-Stampin' Up rubber stamps but in the meantime . . .

Click Here

to be linked to my Stampin Inspirations post on this tutorial or click on to the title of this post.

Sketch Challenge


Until later. . .

Monday, February 12, 2007

Daily Special - Sketch Challenge


Today's Daily Special is "Sketch Challenge". This sketch challenge require that you use an oval punch to create a window for your sentiment. Try it out!

I've decided that every card I post on this blog site will be accompanied by a sketch challenge. Each month, I'll compile all the sketch challenges and create a link with all the sketch challenges for the month. What do you think? Is this a good idea. I think so.

Word Window Punch by Stampin Up is a great way to showcase a sentiment. With this card, I punched a window using the punch, mounted my design with foam tape and behind it stamped a sentiment. As you can see the word "always" is showcased in a little window. Stampin Up Word Window Punch is a very versatile punch. There's a lot of creative things you can do with this punch. On the right of my blog site, scroll down to the "categories" section and click on Word Window Punch for other card ideas using this punch.

I colored the images using colored pencils. This is without using Gamsol. To create the background, I used the "Poppin' Pastel" technique. This technique is a great way to color in backgrounds using pastels rather than dye inks.

Click on "Poppin Pastels" under the "Categories" section to be linked to the tutorial of this particular technique.


Until later. . .

Sunday, February 11, 2007

Featured Website of the Week

I have a new "Featured Website of the Week" and it's "Keiki Cards". To visit the site click here or click on the title of this post.

Keiki Cards is a non-profit organization run by volunteers with the mission to bring sunshine in the lives of children from infants to age 18. Keiki Cards is based in Hawaii but provide their services throughout the U.S. and Canada.

They send handmade cards and gifts on a weekly basis to children who are in the hospital or suffering some sort of illness. The cards are donated by card makers who send their cards to this organization.

Me, my husband and my children have decided to reserve Sunday afternoons making cards to send to Keiki Cards. This afternoon was our first day to make cards and I'll be posting them tomorrow. I wanted to do something constructive and worthwhile and what's better than doing something that I love and involve my family in finding joy in knowing that what they do will help bring a little sunshine in another child's life.

Please visit the website and be a part of this great organization!

Random Cards - Collage Cards

Not into collage cards? It can be fun and artsy and sometimes strange at times. I like to make collage cards to rid of embellishments I have lying around and don't know what to do with.

There was a time when I was really into making these artsy-fartsy cards but I haven't been active in making them.

I just wanted to showcase a few cards I made in the past for those who may be interested in these types of cards. I distressed the background paper by crunching up regular computer paper, then soaked it in walnut ink and water. I allowed it for it to dry and by using direct to paper technique, further aged the paper using Tim Holtz distress inks.

To give the background a collage appearance, I randomly stamped artsy type of stamps all over. I then added various embellishments to dress up the card.


This second card, I used direct to paper technique to distress the cardstock by rubbing Tim Holtz distress ink. Nothing else to this card but stamping an artsy stamp and dressing it up with various embellishments.

If you want to try something new, try making collage cards. . .it's different and expressively flexible.

Until later. . .

Saturday, February 10, 2007

Random Card Again

Another random card I made. I'm really into coloring with pencils right now. I'm having fun with it. My mineral spirits (better known as Gamsol) came in to day and I've been having fun coloring with it. Gamsol is brand of mineral spirits. The bear on this card was colored without using mineral spirits. I'll be doing a tutorial on Gamsol (mineral spirits) and colored pencils sometime this coming week.

This card layout is one of my favorites because it's simple and it usually fits most stamp designs.

I haven't been feeling very creative lately. I guess I've been lazy and very uninspired. When I am feeling this way, I usually don't create anything new. . .just variations of cards that I've made in the past. I rarely ever make bundled sets of cards. I should because it's faster and easier and I can store the card for future use.

Anyway, it's really late and I can barely keep my eyes open right now. Maybe, hopefully, tomorrow I'll be inspired to create something different.

Until later. . .

Random Cards - Fat Cat is Back

Fat cat is back. I made a few cards of this fat cat by Penny Black. I really love Penny Black rubber stamps. The stamp designs are very cute and their most popular stamps are the cats and hedgehogs.


I rubber stamped the hearts and mounted them with foam tape and enhanced them with Stampin Up Crystal Effects. Crystal Effects gives your images that extra shine and 3D appearance.

With the second card. . .I did not know how to use the metal embellishment. There were four holes and could not figure out why. I figured I was suppose attach more metal embellishments to it. . .anyway, however way I was suppose to use them, I think it turned out okay. Hopefully, I'll come across a scrapbook page or card that have an example of how to use these type of embellishments and one day put them together correctly.

Until later. . .

Friday, February 09, 2007

Daily Special - Technique Day - Lumiere and Classic Ink

I did a tutorial on Lumiere and Classic Ink on my "Stampin Inspirations" blog site. I wanted to share it with this site. I'll make a card to post on this blog site that showcases this technique. It's a really fun technique and actually very, very simple. I believe you'll love the results.

Click Here to be linked to my Stampin Inspirations site and the tutorial.

Until later. . .

Thursday, February 08, 2007

Daily Special - Technique Day - Rubber Stamping with Large Stamps


Do you have problems stamping with large or background stamps? Do you have difficulties with complete coverage of the ink on your images? Today's daily special is Technique Day and the tutorial below shows a simple way to ink and rubber stamp large or background stamps.


Ink you image with the stamp image turned upwards facing you. Tap the ink pad on to the rubber and apply pressure as you distribute the ink on to the rubber. Next, rub the ink from side to side and again tap the ink pad on to the rubber. By doing this, it will distribute the ink throughout the whole image without missing a spot.


Carefully, place your cardstock over the inked rubber stamp. Start placing the cardstock from the left side first, while holding the cardstock down as you continue to lay down the cardstock on to the inked image. This is to insure that the cardstock don't move after you place the cardstock down.


Place a piece of paper over the cardstock and the rubber stamp.


Hold down the paper with your left hand and press down from left to right to ink the cardstock with your right hand (my left hand is not showing because I'm taking the picture with it but otherwise, one hand would be holding down the paper) The paper allows you to press down on the cardstock and prevents the cardstock from moving around. If anything would move, it would be the paper. It also allows you to press down without worrying about accidently inking your hand.


If pressing down with you hand is difficult or uncomfortable, use a brayer and roll over the cardstock. When completely inking the cardstock, slowly raise the cardstock from one end and lift upwards.


When completed, you should have a clean image with all areas of the image inked.
Practice a few times. This technique works with both large background stamps and large images.
Happy Stamping!

Wednesday, February 07, 2007

Ahhhh. . .Clean Space Again

Yes, my area is clean again. It won't be for long but it just feels good to have a clean workspace, even for just a day.

I have another desk right next to my main works station but I rarely work on it. I have my die cut machine and sewing maching on that desk.

My desk was purchased through Best Craft Organizer. Click here for their website.

Check out their desk and organizers. The drawers are 1" and 2" drawers to fit rubber stamps and tools. I absolutely love them!! I also have an additional stackable organizer similar to my desk that has slots for 12 x 12 scrapbook papers and additional drawers for rubber stamps and accessories.

Check out the website! I feel they have the best desk and organizers mainly because their products are made specifically for rubber stampers.

Until later. . .

Random Cards - Get Well Cards

I made these get well cards last night before I went to bed. Just a few quickie cards. . .well, the layout was a quickie, the coloring wasn't. I actually colored the bears while watching television earlier in the week and had set them aside for future use. I color images while doing other activities like watching TV or listening to music, set them aside, and when I have the time put them together.

Card Detail:

Stamp: CTMH Patch, Hero Arts sentiment
Paper: Stampin Up Pretty in Pink, Positively Pink, Close to Cocoa, DCWV scrapbook paper
Ink: Stazon jet black, color pencils, Stampin Up Positively Pink
Accessories: Organdy ribbon, Marvy tag punch, Scalloped scissors, eyelets, gold metallic cord


Card Detail:

Stamp: Same as above
Paper: Stampin Up Tempting Turquoise, Whisper White, Chocolate Chip, DCWV scrapbook paper
Ink: Stazon Jet Black, Colored Pencils
Accessories: Organdy ribbon, Scalloped Scissors, Star charm


Tuesday, February 06, 2007

House Mouse Cards

I made a few cards with House Mouse Stamps. . .the House Mouse designs are one of my favorite stamps. For those of you who are unfamiliar with this stamp series, the quality of the stamped images are one of the most detailed and excellent quality image that I've found so far.

It's not just a simple doodle stamp but it is a work of art. As I've said before in other posts, because of the detailed art work, coloring these little critters can be time consuming but so worth the time when you see the quality of the finished product.


Card detail:


Stamp: Stampabilities Lavender Dreams, Anna Griffith sentiment stamp
Paper: Serendipity Caramel, Stampin Up Pretty in Pink, White Glossy Cardstock, Provocraft Scrapbook Paper
Ink: Stazon jet black, Stampin Up Pastels
Accessories: Stampin Up 1 inch circle punch, Silver brad, Making Memories designer ribbon, Stickles


This next card I enhanced the flowers with Stampin Up Crystal effects to give it a 3D shiny appearance. You can't see it in the picture but it really enhances the appearance of the flowers. I don't apply the Crystal Effect on the whole flowers, just the outline. . .it also gives the flowers a unique texture. You should give it a try sometime. I used crystal effects on my card on the previous post as well. You can see the effect better on that card.


Stamp: Stampabilities Special Delivery, Hero Arts Sentiment stamp

Paper: Serendipity eggplant cardstock, Stampin Up Orchid Opulance, White GlossyCardstock

Ink: Stazon Jet Black, Stampin Up markers and pastels

Accessories: Making Memories ribbons, Marvy tag punch, hemp cord, scalloped scissors, Stampin Up Crystal Effects


Until later. . .

Penny Black Hedgehog - Stampin Up Crystal Effects

I made a few cards today. . .I'm so proud of myself!! I've been sort of slow on making cards the last few days because I lacked motivation and I've been so busy doing other things. So. . .to make a few cards really makes me feel I'm back to my old self.

I don't know if you can see it but the apples on this card is shiny. To create this shiny effect, I used Stampin' Up Crystal Effects. It's pretty much a glue that dries clear and give your images a dimensional or raised shiny appearnce to enhance your stamped images. I love using this medium to dress up my cards. Other brands that carry a similar dimensional glue is Inkidinkado "Glossy Accents", Aileene's "Paper Gloss", and Judikin's "Dazzling Diamonds".

Card details:

Stamp: Penny Black Bushel of Smiles, Anna Griffith sentiment stamp
Paper: Stampin Up Green Galore, Positively Pink, White Glossy Cardstock, DCWV Scrapbook Paper
Ink: Stazon jet black, Stampin Up Markers and Pastels
Accessories: Swirl Clip, Making Memories Ribbon

Daily Special - Anything But Cards - Card/Memo Folder

Check out the tutorial on my Stampin Inspirations blog site. The tutorial is on a "Card/Memo Folder".

Click here to be linked to the my Stampin Up Inspirations blog site or click on the title of this post.

I'll make another Card/memo folder and upload a picture on to this site.

Until later. . .

Monday, February 05, 2007

Featured Blogger of the Week

I have a new "Featured Blogger of the Week"! I chose "Stamping 101" to be featured this week. Although it appears that her blog site is fairly new, she already has a bunch of great tutorials. I'm originally from Hawaii and it was great to see the Aloha flip-flop card that she made. To check out her blog site, click here . . .or click on the title of this post to be linked to her site.

I am retiring Inkventive Expressions to my sidebar but don't despair, if you haven't already added her site to your favorites, the link to her blog site will be located to the right of my blog site under the heading "Featured Blogger" and you can visit her site at any time!!

Until later. . .

Response to My "Tell Me About Yourself" Questionnaire

Because my questionnaire was so long, I'll post a few of the responses I received each day until I cover them all. It was reaaaaaaaaaaaaaally fun reading your responses and I want to thank you for taking the time to fill out my questionnaire.

For the first question "How long have you been rubber stamping?"

The majority responded 1 to 4 years. I'll be making 4 years this year so I had this in common with my respondents. The average was 2 to 3 years. BUT. . .approximately 30% have been stamping for over 5 years and 5 of the 49 respondents have been rubber stamping for over 10 years and Linda Y. has been rubber stamping for 15 years. I never heard of rubber stamping up until 5 years ago. . .imagine, someone rubber stamping for 15 years! Linda Y. . .you should create a blog site and share your vast rubber stamping experience with all of us!!

There were a few newbies <1 year - approximately 7 of the 49 respondents have been rubber stamping for less than a year. Shelly, Emily, Rochelle, and Kris are super newbies. . .they just started stamping! Welcome to the world of rubber stamping!!! I hope you stick it out and continue to learn!

The second question was "How often do you rubber stamp or make cards?"

An overwhelming majority responded with either daily or several times a week. There were about 5 of you that rubber stamped occasionally like once a month or once a week. Wow, it's really great to hear that I'm not the only one that rubber stamps daily or several times a week. Honestly, I thought I was a minority and that most rubber stampers rubber stamped a few times a month. I thought I was spending too much time with this hobby and I've been rest assured that I'm no different from many rubber stampers out there!

Trish rubber stamps daily and said "A day without stamping is a day without sunshine". Hahaha! I like that!

Okay. . .that's the two questions and responses for the day. I'll do two more tomorrow~

Until later. . .

Sunday, February 04, 2007

Daily Special - Technique Day - Coloring With Pencils

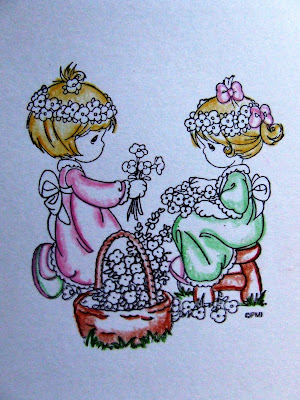
I'll do a Daily Special today and it's "Technique Day" - Coloring with pencils. I used a very cheap pencil that I recently bought at Michael's. This set of 24 was only $12.99. Prisma color pencils are $48 I believe for a set of 24 so a $12.99 set is considered very cheap. These pencils are made by Koh-I-Noor. This set of pencils are softer than other lead pencils so it was easier to blend with them. It didn't take as much work to blend as the harder lead pencils.


Here is a basic tutorial on coloring:

I used a regular matte cardstock to stamp my image.


First step: Outline your image. Save the detailed parts of the image for last.

Step 2: In a circular motion, from the outline inwards, color in the image using a small amount of pressure. Don't color in a straight up and down motion, circular strokes are best. Don't worry if your coloring don't look that pretty. This is just the base.

As you can see I left the centered areas uncolored. These areas will be the highlighted areas. Imagine where your light source and where you would think the light would shine on your image. . .it could be to the left side, right, or middle - whichever side, be consistent.

In my example below, my light source (in my mind - not literally) is slightly above and centered on the image, therefore the highlights will be at the center. Does it make sense?

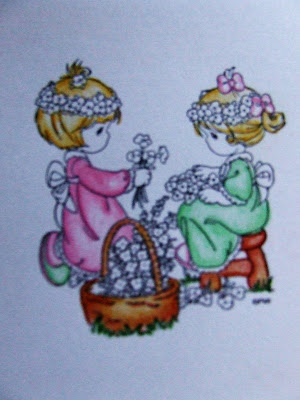
For vases and jars, you may initially want to color in a horizontal motion following the curvature of the vase or jar then start to use a circular motion as you color inwards. The same applies with folds such as clothing.

You need to use a little bit of your imagination. Just think where shadows would appear. . .under a fold, under the chair. . .color those areas darker than areas exposed to light, again in a circular motion.


When coloring hair, color the outline and slightly outside of the outline but don't color the whole head of hair. It's even okay to leave some parts of the hair uncolored - just fade out your coloring as you head towards the center. Hair at the top of the head is usually lighter than the bottom so color those areas accordingly.


Step 3: Sorry but the picture is blurry. Now, with lighter pressured circular motion, continue to color inwards from the originally shaded areas. Color the shaded areas as well, blending the colors in, but while you're coloring inwards from your outline towards the center, place less pressure on your coloring strokes. The lightest strokes are reserved for the center . . .barely color in as you head towards the center.


Last step: Color in the detailed parts of your image. For flowers, color the center and under the flowers darker than the outer parts of the petals (in real life, the outer parts of the petals are exposed to the sun, therefore would be lighter than the inner portions of the flower). The same applies to leaves, as well as ribbons.


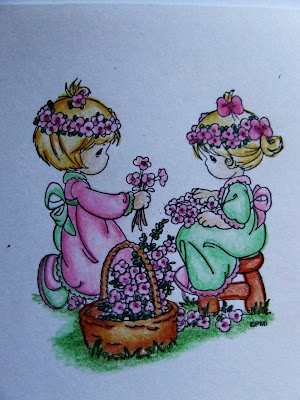
The key to coloring is your strokes and ability to add shading and highlights. Apply more pressure to your coloring for shaded areas, lighter pressure in highlighted areas. Always use circular motion to color and blend the colors in very well.


I used two types of brown for the basket and the stool. One lighter and the other a darker shade. I mixed and overlapped the lighter color with the darker color to prevent an obvious demarcation between the two colors.


Practice, practice, practice. . .it takes a while to get good at it but once you are able to control the amount of pressure applied to your coloring strokes, you'll get the results that you want.

<<>


That's it. Hope this tutorial helps a bit with coloring.

Until later. . .